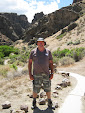
Heres a photo of my hiking staff. Notice the extremely handsome fellow holding it. The fancy top is a chrome plated brass knob with a shaft about 3 inches long. I drilled a hole big enough for the shaft to fit in and glued it with liquid nails. It adds a bit of weight to the stick as well as a hard point for fending off wild critters, 2 and 4 legged. You may notice that duct tape and liquid nails are the two most essential tools in my survival kit. I never go anywhere without them. Good stuff.

Heres a photo of the bottom. Its heavy brass tubing I salvaged from an old brass headboard from a bed. This will protect the end from mushrooming and splitting. I drilled through the brass and wood and drove some small nails into it. It covers the bottom as well as the sides like a cap.

Heres a close up of the end cap.

This photo shows the markings burnt into the staff with a wood burning pen. I marked it off at one, two, and three foot increments. It helps to make measurements in the wilds at times.

This photo shows the reverse side of the staff. I burnt marks every inch for a foot length.

The staff is a limb from a eucalyptus tree I salvaged in the desert of Arizona. Its very strong wood and should last quite a while.
Heres a photo of the top of the staff.

This is a photo of my "signature" or makers mark. A backwards "R" connected to an "L", my initials. I've used this for years on my art work and wood work.

Thanks for looking and enjoy. I hope you've been inspired to personalize your gear.


 Heres a photo of the bottom. Its heavy brass tubing I salvaged from an old brass headboard from a bed. This will protect the end from mushrooming and splitting. I drilled through the brass and wood and drove some small nails into it. It covers the bottom as well as the sides like a cap.
 This photo shows the markings burnt into the staff with a wood burning pen. I marked it off at one, two, and three foot increments. It helps to make measurements in the wilds at times.
 This photo shows the reverse side of the staff. I burnt marks every inch for a foot length.