Rons Primitive Skills

Custom Search

Search This Blog

Showing posts with label survival gear. Show all posts

Wednesday, January 27, 2021

Condor Village Parang

I sprang for the parang. Yuck yuck. After the fiasco with the Kershaw useless piece of garbage I bought a real parang-the Condor Tool & Knife Village Parang. I paid $73 plus change at Amazon, free 4 days shipping, and its from the Condor Tool & Knife store so I'm getting the real deal. This is the cheapest I could find it anywhere. The sale price at Amazon was $68.65 so the rest is about $5 in tax's. If you want good gear you have to pay for it. The Village parang is a solid tool weighing in at 1 pound 9 ounces. The blade is 12 inch's long with a 10 inch cutting edge, with 6 inch handle its 18 inch's overall and the blade is 3/16 inch thick.  It is full tang and has a hardwood handle pinned to the blade with heavy brass pins. There is also a brass lined lanyard hole at the back of the handle. It comes in a leather sheath and I remember seeing some You Tube videos about the sheath being shoddy. These were made back around 2013 or so and I hope Condor got the message and remedied the problem. There are a lot of reviews on You Tube but most are pretty boring. I enjoy the videos put out by Paul Coakley as Junglecrafty and a short one by the master of the parang, Ray Mears. All of Pauls videos are well done and you learn a lot. Much better than some young buck wailing on a stump with a plastic handled parang or golok or an 18 inch bladed machete. Of course, I enjoy all of Ray Mears videos and sometimes I catch a few Les Stroud shows. Those are my favorites. As a side note you can get all of Ron Hood and John McPherson's videos on Internet Archive. https://archive.org/search.php?query=woodsmaster&and[]=mediatype%3A%22movies%22 for Ron Hood and https://archive.org/details/primitive_wilderness_skills for John McPherson. John and his wife Geri are the authors of two of the best primitive skills books out there, Naked Into The Wilderness 1 & 2.

I'll be using the parang around the farm and in my travels. I'll be sure to post anything interesting about this quality tool. Here are some images of the CT&K Village Parang.


Tuesday, January 26, 2021

Less is more......

 ....easier to carry. I have several types of fire making kits such as flint and steel, ferro rod, good old BIC, fire bow & drill and this one. It depends on what mood I'm in or where I'm going to choose the type I take.  This is my sparking wheel fire kit I sometimes carry when out and about. As you can see there isn't a lot of stuff that makes up this kit. In the first picture is a Micro Sparkwheel Fire Starter from UST (Ultimate Survival Technologies) https://www.ebay.com/itm/Ultimate-Survival-Technologies-UST-Micro-Spark-Wheel-Weatherproof-20-02032-02/323795978453?ssPageName=STRK%3AMEBIDX%3AIT&_trksid=p2057872.m2749.l2649 and I paid all of $13 for two of them on eBay. One for my kit and one for the wife's. This is a great little piece of equipment for anyone to own and its very easy to master. There are several YouTube videos showing it, however I personally don't recommend running the wheel on a rock. Using your thumb is plenty good enough. These are about 1 1/2 inches long and come in a handy little tube with instructions and 3 extra flints. I put a spare spring from a defunct Bic lighter which I cut to size in the tube with everything else. I was shown one of these when they first came out and I was impressed by the amount of sparks and the bomb proof construction. Next is a pack of spare flints by Ronson. I recently bought a bulk lot of Zippo flints on eBay, 12 packs of 6 for a total of 72 flints. $10 for all, free shipping. What a deal! These should last for a very long time. I took the holders out of the bubble packs and put them in an empty vitamin bottle with a couple of moisture absorbers. Ronson and Zippo flints are made in Austria and are top quality as well as capable of throwing lots of hot sparks. I think the flints that come with the Micro are made in China but I'll use them up none the less. Here's the link: https://www.ebay.com/itm/New-Zippo-Replacement-12-Flint-Value-Packs-for-All-Zippo-Lighter/261508751771?ssPageName=STRK%3AMEBIDX%3AIT&_trksid=p2057872.m2749.l2649

 The brass tube with the kerosene lamp wick is a fire tube. I made a similar one years ago using a longer piece of brass and some 100% cotton rope. Link: https://ronsprimitiveskills.blogspot.com/2009/09/fire.html This one is made with 3/4 inch wide 100% cotton lantern or lamp wick. Again, I bought two 6 1/2 foot rolls of this for around $6 on Amazon. Link: https://www.amazon.com/gp/product/B08MXXVXW2/ref=ppx_yo_dt_b_asin_title_o03_s00?ie=UTF8&psc=1  The tube is made from a fired .38 shell. This is much smaller than the one that uses the rope and you simply roll up the lamp wick, insert and you're just about ready. You need to char the end and to extinguish carefully pull the end of the smoldering wick halfway down the tube and put your thumb over the tube. Simple. The next time you need it just give it a dose of sparks and blow gently on the smoking tip.

Next is a nickel plated brass pill bottle. These are sold at most drug stores and I'm sure they can be found cheaper at Amazon, eBay, etc. This one has a screw top lid with a rubber gasket. Its full of my favorite fire starters - Coghlans. These are getting a little hard to find but in my opinion they are the best. Treat them like petroleum jelly cotton balls and you will get fire at first strike. I don't know the formula but they are cotton with petroleum jelly and some kind of wax. They are pink when brand new. These are over 15 years old and take off like I bought them yesterday.

The small canvas case, about 4 1/2 by 3 1/2 inches, contains this fire kit and a few minor essentials such as a piece of fat wood, some safety pins, a very handy multi use large finger nail clipper, a scalpel blade in its package and my little Brunton key chain compass. I threw in about 5 or 6 pieces of bicycle inner tube maybe 1/4 inch wide. They are great for wet weather fire starting. I keep an eye on the weather and if it even looks like rain I have a small zip lock snack bag full of very dry tinder stuffed in my pocket along with this kit. Just a guess but the whole thing probably weighs less than 5 ounces.


Saturday, January 23, 2021

The Kershaw Camp 12 Parang


This is something I did a lot of research on so I dropped a grand total of $31.96 to eCop! on Amazon. It arrived in 5 days. Sweet. Now to put it through its paces. I'll use this around the farm here, mostly for brush clearing. I'll give a full report after this thing gets a good workout. I'm looking to buy a similar sized parang for my bush kit and the Condor Village parang looks like it could fill the spot. Here are the specs for this tool:

There is a certain way you cut with these, there are a few good videos on you tube showing this technique, and it can make working with one safe and less tiring.

Wednesday, June 12, 2013

Gerber Dime

I admit it. I am a gearhead. I love to try out new toys and see if its worth keeping. The Gerber Dime is one of those things that intrigued me from the moment I laid eyes on it. I have my venerable old Gerber pliers from way back in 1992, the black ones, and they have never failed me. I am on the second sheath for those puppies. What I like about the Dime is its size. I wanted a handy little set of pliers for my key chain. These are just right for light weight work and I needed a thin set of pliers for some of my electronic repairs and do-dads. The pliers are only 1/8" thick, perfect for hard to reach places in most modern, cramped, electronics compartments. The Dime answered the requirement. The bonus is all the tools they managed to pack in this 2 3/4" device. If you look at the pictures you will note: long nose pliers with wire cutters, scissors, tweezers, bottle opener, file, Philips screw driver, regular screw driver, knife blade and a package opening blade which works really well for opening those damn plastic packages and some small carving work, too. As you can see, it fits just fine on my key chain. The only thing that I don't need on it is the bottle opener, but I'm sure there can be another use for it down the road. Fit and finish is A+ and all the blades are tight and no play at all. The scissors are kind of a pain to use because the handle that's not attached to the body has to go into the tools slot to close them fully but I just look at them as a bonus. The tweezers are well hidden. If you don't know where to look you won't find them. I've pulled them out in the last photo. One other nice thing about the design is the tools can be used with the pliers closed. The only tools that can be used with the pliers open is the Philips screwdriver/file, the bottle opener and the tweezers. I give it an 8 out of 10 rating because of the lack of printed instructions (which would help to find the darn tweezers!) and the bottle opener. Just my opinion. Still, I feel they are worth the $15 I paid for them.


A perfect addition to my keychain.


The tweezers exposed! Well hidden and not easy to find unless you're lucky.

Monday, July 25, 2011

Survival gear modifications and some new gear


 Here are a few modifications to gear and some new gear photos. First is a photo of my Ontario Cutlery SP 2-95 Air Force Survival Knife. I made a modification to the handle. It had a guard at the top similar to the bottom one. I cut the guard off about level with the spine of the blade and sanded it down to look nice. This gives me a lot more leverage and grip varieties with this excellent knife. Here's a link to an older article that shows the knife as I bought it.
http://ronsprimitiveskills.blogspot.com/2009/07/my-favorite-knives.html
 I love the sheath that came with this knife. It's very secure and built tough. I may add a small pouch just big enough for a fire steel and a diamond hone to the front of the sheath. That would compliment this blade just right.


This next pair of photo's shows a new addition to my knife assortment. I don't call them a collection. To me a collection is a group of articles that set on a shelf for looking at and going "UH AH!" I have two knives that I will call a collection. They are both a Talibon machete and a Talabon knife from WW2 era Philippine Islands. Here's a link that shows some similar blades. They have the same shape, handles, and wooden sheaths but are more fancy than mine. These blades are beveled on one side only. http://arms2armor.com/store/product1318.html

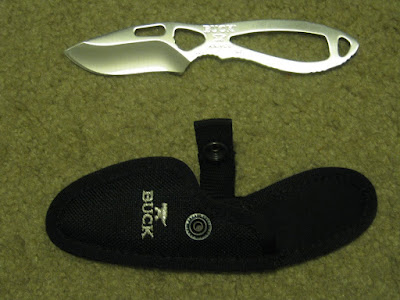
The knife pictured is a Buck Paklite. Its a very well made knife and the edge is razor sharp out of the box. I love the sheath on this one too. This brings something up that makes me wonder. I see in the forums where the first thing people do is complain about the sheaths on their new knives. I think its fine if you want to make or have made a custom sheath, but, I also think that the knife companies have had a lot more experience making knives and sheaths and have thoroughly thought these things through. The only blade I had to make a sheath for was my Gerber Freeman. The sheath that came with it was truly a crapper! I like all the sheaths that came with all my newer knives with one exception and that is the Ontario Kukri sheath. I wish they had made it on par with the sheaths for the SP line. I plan on modifying the Kukri sheath with a little bit of black leather. I'll be sure and post pics when its done.


Next are some photos of my new saw. Well, its new to me. I just found out these were made in the 1980's! So, that means this baby has sat in some warehouse in its original skin since the 80's. Cool. I was wondering why I couldn't find any info on the net.
Its a Granberg Model G530 folding buck saw. I bought it from a guy on eBay for a princely sum of $25. The saw weighs 1 1/2 pounds and is 24 inches long. The blade that came with it is made in Japan and is good quality and has a good temper. It's a seasoned/dry wood blade. I plan on buying a pair of Bahco blades for this saw, a green wood and a seasoned/dry wood blade for spares. The cutting depth from tooth tip to crossbar is 6 1/2inches. I like the way it all slides neatly together for packing. The crossbar and tension rod are aluminum while both side handles are steel. The only modification I did was to put some wood shims in the handles to keep the blade centered and steady. Before I did this the saw would wonder and wobble like crazy. This helped tremendously and now the saw cuts fast and straight. The last picture shows the wooden shims. They also keep the blade centered when I fold it back up thus keeping the teeth from banging into the steel handles if I'm extra careful. The only other mod I plan on doing is to replace the tension rod with steel all-thread of the same diameter or close to it. A couple wing nuts will do the trick if the single wing nut that came with it doesn't fit the new rod.