Rons Primitive Skills

Custom Search

Search This Blog

Showing posts with label flint knapping. Show all posts

Friday, June 7, 2013

The volcanic west

Volcanic rock formations at Jump creek, Idaho
I noticed how much the whole region of southeastern Oregon, northeast Nevada, and southwest Idaho have the same topography and geology. Its all volcanic. This region is famous for quite a few gemstone localities such as Succor creek geodes and thunder eggs, Bruneau jasper, and several other well known localities. The country rock is mostly basalt grading into rhyolite and other volcanic's. It is believed that the rock that forms the Treasure valley where Caldwell, Nampa and Boise are situated formed under an inland sea. The geologists have found formations similar to those found under the Pacific ocean. In my wanderings I have found a few rocks that would perform admirably as tools. There is a dense form of basalt, no bubbles as is typical, that knapp's out just fine. I'm sure there are some local artifacts made from the same stuff. Of course, where there is any kind of volcanic rock there is bound to be some silica minerals (quartz mainly) that form in the vesicles (bubbles). This would be premier knapping material. I saw a collection that has several local pieces that are made from quartz family rock and even some obsidian. I don't know where the closest obsidian outcrop is but it was considered primo stuff and was carried very far to trade and work. I'll definitely be keeping my eyes open and report and new finds or discoveries. I hope to find some good knapping material. Mine is all gone. Take care everyone!!

Saturday, December 17, 2011

Side hafted microblade

After seeing these on Elfshots blog http://elfshotgallery.blogspot.com/2010/02/palaeoeskimo-side-hafted-microblades.html I decided I had to make one. It was surprisingly easy, kind of like a Hoko knife. With modern tools (my Warren carving knife with a straight blade and a tiny gouge) it went quick, less than an hour. With stone tools and depending on experience it probably took the old ones maybe an hour or less. I used artificial sinew split up into many strands and no glue. The original article doesnt state if glue was found on the preserved artifacts and I really don't think hide glue was all that common on the Arctic and sub Arctic coastal areas. Tim Rast, the owner of Eflshot is a professional archaeologist and maker of things ancient. He has made a bunch of these out of wood, antler, and bone. Please take the time to peruse his site for the many excellent articles on Eskimo and related cultures and their artifacts.

This shows the groove where the blade sets.


Here's a shot of the handle with two notches for the cordage. I used cottonwood for this knife.
This shot shows the brace which is held snug against the blade when tied in place at the two notches on top..
This shows the notch in the brace which sets against the blade.
Here's the blade. I made it from a piece of flint I found in Colorado.
This shows everything set up ready to finish.
This is the completed knife. Overall length is 5 inches.
Closeup of the finished knife. Stone, wood, sinew-a simple but efficient tool.

Monday, November 28, 2011

Paleo stone micro drill

I was showing some antler needles I made on a forum and one guy asked how I drilled the holes. I told him of a quartz micro drill I made. I can't find it for the life of me and the last I saw it was several years ago. The drill was a long, slender sliver that came off a huge crystal I was taking spalls from. I bought the crystal very cheap because it was dropped and the tip pulverized. I mounted the sliver in a piece of bamboo chop stick after flaking a good edge on both sides. I use a deer antler tine for this kind of flaking because I can keep the tip of the antler ground very small to a wedge shape. I retouch the edge as I work to keep a good clean working tip. The quartz drill was just under 1/4" total length and about 3/16" protruded from the end of the chop stick. The short piece of chop stick with stone tip was mounted into a larger diameter handle and twirled like a fire hand drill.

I made the drill in the photos from a piece of  debitage an archaeologist friend had given me. He collected several bags from the surface of an ancient village site that was being built on. I don't know if the archaeologists ever did anything at this site before all the building took place. He was kind enough to give me several bags. This stuff is wonderful to knap and I wouldn't doubt it was heat treated by the ancient artist who made tools from the rock.

I plan to make a bow drill using this set up. I saw one on BushcraftUK a few years back and the maker did a wonderful job. Its the last picture. I did a screen capture from the original article but I can't find it on the site any longer.

Here's the finished drill. Almost 1/4" long OAL.

The shaft after taking out the notch. I used a very thin flake and made two splits and used a pointed end to cut into the base of the notch section to be removed. Then pinched the stick together and used a bit thicker flake to push the notch out of the side till it broke clean. The indents in the sides are for the sinew to get a good hold. The bamboo chop stick is whittled down to about 3/16" diameter.

Here's the drill mounted and waiting for sinew and hide glue. My hide glue is made of an old elk hoof and a few scraps of rawhide chew toy, I use a piece about the size of a nickel and had plenty left over. I use dried flakes and pieces and reconstitute with hot water.

All finished. The sinew is deer leg sinew and the hide glue is smeared over it as well as in the notch. I left this one full length, about 12" and twirl it like a fire drill. It needs to be cut off and mounted in something a little thicker for better control.
Someone at BushcraftUK made this a few years back. Admirable work and I like his set up for doing antler needle eyes. He uses twigs set in the cracks in the log to hold the antler steady. Great idea!

Thursday, November 3, 2011

Pacific coast knapping materials

My wife and I like to go to the coast as often as possible. I can indulge in some serious beach combing and she likes to sit on the beach and relax. One of my hobbies is shell collecting and I have a fairly serious collection. Occasionally I'll find a goody or two and if I really luck out there will be enough for some trading. One thing I keep an eye out for is knapping material. I've only found stuff like this where a creek or river flows into the ocean. My best spot has yielded some very good knapping rock. It comes in nice colors like red, green, brown, and gray. Some is chert and a little bit is very glossy flint. It all knaps just fine. I'll give you a clue as to where I find it:between Monterey Bay and Morro Bay.If you are cruising Highway 1, check out any place where there are streams emptying into the Pacific. Enjoy!!! Maybe you'll luck into a nice big chunk of jade!


Sunday, September 16, 2007

Todays knapping and a few more rocks & artifacts

I've had these little flakes of Burlington chert lying around so I did a little knapping. The one at top left is my rendition of a Cahokia shark tooth effigy point. The rest are just oddball points that came out of the rock on their own. I wasn't trying to make any certain type of points, I just let the rock decide. All of this rock is untreated except the bottom two. I did the heat treatment in a campfire when I found the chert. I buried it about 2" deep in some beach sand and built a healthy fire over top. The next morning I dug out the chert and surprisingly there was no pot lidding or cracked chert. It came out pretty nice, color and workability.

These points are all Colorado material from around Grand Junction. The toughest one to knap is the middle piece above the penny. Its untreated chalcedony. The two in the bottom row are common opal from Opal hill which is west of GJ. This stuff knaps like glass and is beautiful rock. Wish I had more. Again, I just let the rock decide what shape it would turn into.
Heres a picture of a nodule of Burlington as found on the shore of Truman Lake, Missouri. It has a thick cortex, or coating, which is kind of chalky.
Heres an end shot of the nodule showing the chert interior. This is some fine knapping material. You can plainly see the cortex in this photo.
Heres a super nice specimen of native copper crystals from the Upper Peninsula of Michigan. It was found at an old copper mine near Houghton. The American Indians used native copper for thousands of years to make tools. They traded a lot of it as can be seen in the contents of mounds and burials far away from the source.
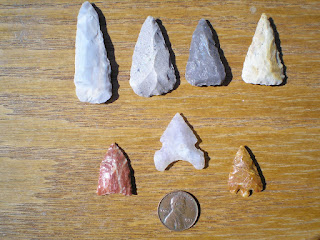
Heres a group of stone tools from North Africa. I bought them at the Tucson gem and mineral show. The dealer said these were from western Algeria. The top three are uniface blades. I really like the little points, especially the one on the left. I was a bit surprised to see these listed in Oversreets Arrowhead price guide. They're in the back of the book. These are going pretty cheap right now. I paid a dollar each. After the supply starts to dwindle they'll likely go way up in price. Get em while ya can if ya make it to Tucson in February!
Thanks for looking and enjoy!

Monday, September 10, 2007

Mouse pressure flaking pad and new point

These three pictures show my pressure flaking pad. I made it from an old mouse pad. I spaced the pieces of pad so I would have different flake widths to work with. Everything is glued together with Liquid Nails. I find this glue to work best because it stays somewhat tacky and flexible. This pad has seen a lot of use and nothing has loosened up.


The following two pictures are of a point I just finished yesterday using the pad. I used copper and antler flaking tools. The point is 1 1/2" long. Its made out of "silicafied ash" from the Grand Junction, Colorado area.


Thanks for looking!
Ron