Rons Primitive Skills

Custom Search

Search This Blog

Wednesday, July 27, 2011

Corona Mill for whole grain bread-store what you eat and eat what you store

I wanted to try something different and also use up some old storage food so I got my trusty Corona mill out and dusted it off. I like to practice doing different things with it like grinding different grains and beans to make new recipes I've read. Over the years I must have downloaded a hundred cookbooks and recipe books. I have a good selection on making different breads and I had a craving for some whole wheat bread. It was time to rotate some grain. I have about 10 pounds each of hard red winter wheat and triticale in the pantry that needed used up soon. I found a very simple wheat bread recipe and I substituted half the wheat with the triticale. Now, the Corona isn't made to make flour of the fineness that you buy in the store. It was originally made to grind corn which is a staple in Central and South American cooking. In other words it grinds coarse. This is fine and after running the grains through the Corona three times I had the desired size of grain I wanted. It is equal in size to the grains in real whole wheat bread you pay too much for at the grocery store. You can set the "tightness" of the grinding plate faces incrementally as you go from very coarse to the finest it will grind.
Triticale is a hybrid grain. Its a cross between wheat and rye and the grains even look like wheat. In the raw the grain looks just like a light colored wheat grain. Not at all like hard red winter or spring wheat. It has a different taste, somewhat like rye bread, that my wife and I both enjoy.
I don't have a regular grain mill that is capable of making flour but thats not a real big problem for now. I'll probably pick up one of those hand powered "country living" ones. I don't like the idea of having to depend on anything electric for when things go south. Who knows how long till powers restored? I buy whole wheat flour by the 25 pound bag and keep it airtight and cool so it lasts a good long time. I only use a little of the store bought flour to give anything I bake a little body. The recipe called for 3 3/4 cups of flour but I used about 3/4 cup and the whole grain made up the difference. I still have about 1 1/2 pound of the ground grain left over for more baking. It keeps well in the refrigerator for a few days. It came out very good and we ate well tonight.

 Heres the set up. I switched the round bowl to a square bowl to better catch the grindings.

 This is the bowl of grain after the third setting and grinding. The mill face is set as tight as it will go.

 This is a close up of the ground grain.

 Clean up. There was very little waste-about half a teaspoon of grain and flour.

 Yum.

Monday, July 25, 2011

Survival gear modifications and some new gear


 Here are a few modifications to gear and some new gear photos. First is a photo of my Ontario Cutlery SP 2-95 Air Force Survival Knife. I made a modification to the handle. It had a guard at the top similar to the bottom one. I cut the guard off about level with the spine of the blade and sanded it down to look nice. This gives me a lot more leverage and grip varieties with this excellent knife. Here's a link to an older article that shows the knife as I bought it.
http://ronsprimitiveskills.blogspot.com/2009/07/my-favorite-knives.html
 I love the sheath that came with this knife. It's very secure and built tough. I may add a small pouch just big enough for a fire steel and a diamond hone to the front of the sheath. That would compliment this blade just right.


This next pair of photo's shows a new addition to my knife assortment. I don't call them a collection. To me a collection is a group of articles that set on a shelf for looking at and going "UH AH!" I have two knives that I will call a collection. They are both a Talibon machete and a Talabon knife from WW2 era Philippine Islands. Here's a link that shows some similar blades. They have the same shape, handles, and wooden sheaths but are more fancy than mine. These blades are beveled on one side only. http://arms2armor.com/store/product1318.html

The knife pictured is a Buck Paklite. Its a very well made knife and the edge is razor sharp out of the box. I love the sheath on this one too. This brings something up that makes me wonder. I see in the forums where the first thing people do is complain about the sheaths on their new knives. I think its fine if you want to make or have made a custom sheath, but, I also think that the knife companies have had a lot more experience making knives and sheaths and have thoroughly thought these things through. The only blade I had to make a sheath for was my Gerber Freeman. The sheath that came with it was truly a crapper! I like all the sheaths that came with all my newer knives with one exception and that is the Ontario Kukri sheath. I wish they had made it on par with the sheaths for the SP line. I plan on modifying the Kukri sheath with a little bit of black leather. I'll be sure and post pics when its done.


Next are some photos of my new saw. Well, its new to me. I just found out these were made in the 1980's! So, that means this baby has sat in some warehouse in its original skin since the 80's. Cool. I was wondering why I couldn't find any info on the net.
Its a Granberg Model G530 folding buck saw. I bought it from a guy on eBay for a princely sum of $25. The saw weighs 1 1/2 pounds and is 24 inches long. The blade that came with it is made in Japan and is good quality and has a good temper. It's a seasoned/dry wood blade. I plan on buying a pair of Bahco blades for this saw, a green wood and a seasoned/dry wood blade for spares. The cutting depth from tooth tip to crossbar is 6 1/2inches. I like the way it all slides neatly together for packing. The crossbar and tension rod are aluminum while both side handles are steel. The only modification I did was to put some wood shims in the handles to keep the blade centered and steady. Before I did this the saw would wonder and wobble like crazy. This helped tremendously and now the saw cuts fast and straight. The last picture shows the wooden shims. They also keep the blade centered when I fold it back up thus keeping the teeth from banging into the steel handles if I'm extra careful. The only other mod I plan on doing is to replace the tension rod with steel all-thread of the same diameter or close to it. A couple wing nuts will do the trick if the single wing nut that came with it doesn't fit the new rod.


Friday, July 15, 2011

Survival mega fire kit


Here are photos of one of my fire kits.I call this one my mega kit because of the size of the rod-5 inches long and 1/2 inch across! Its called the "Moose". I got this from my favorite store, Going Gear.
http://goinggear.com/index.php?main_page=product_info&cPath=4&products_id=84
I should be able to start several thousand fires with the big boy. I keep the rod, striker, and a tiny zip lock bag with 2 pieces of Coghlans emergency tinder in the leather pouch.

The first shot shows a box of carbide pieces I bought several years ago. I think these are used to re-tooth industrial saws and machine shop tools. These are 1 x 1/4 x 1/16 inches. I intended to make a few knife sharpeners and never got around to it. I did make some very nice ferro rod spark strikers that will last several life times. I don't think I will be able to dull the edge on this thing even if I go through a dozen roods like the one pictured. Carbide is very tough stuff. It can sharpened with diamond laps and that's the only thing I know of that will touch it. That's why its used in saws, drill bits, rotary rasps, machining tools, etc.

This striker is 2 1/4 inches long and as you can see its mounted in a piece of deer antler. I used an oval needle file to make the grooves for improved grip. Getting the carbide into the antler was easy. I drilled 3 holes in line and used a diamond Dremel bit to enlarge the slot for the carbide. Super glue did the trick for holding the carbide in place. Drilling a hole for the lanyard and attaching same was the last part of the construction.

I carry a film canister of Coghlans Emergency Tinder with this kit. Also, there's a zip lock with two pieces in the pouch with the rod and striker.
http://www.coghlans.com/products/tinder-8649
I like to use natural tinder, but the Coghlans is a never fail starter for times when I need a fire in a hurry. I used it once to start a fire during a sudden downpour in the mountains. It easily takes a spark and burns long enough to get damp tinder going. I experimented by using a pea sized piece of this tinder and that's usually enough to get a fire.

The mega kit is shown at the bottom. The two photos before the mega kit show one of my antler cased ferro rods with a striker attached to the lanyard. The rod in this is 2 1/2" x 1/4".


Monday, July 11, 2011

My nettle patch-primitive cordage and healthy food.

 These are photos of one patch of stinging nettles, Urtica dioica, I have been watching. Stinging nettle is one of the premier cordage plants. These are on the average 10 to 12 feet tall. They are the benefit of a very wet spring and early summer. I want to harvest just a few for summer cordage experiments, but the majority will be harvested after the first frost. According to most folks who know nettles and my own experience, the fiber is better after the frost. It should be harvested before it rains because nettle is prone to deteriorate quickly when wet. I have never tried retting it but it has been done and the smell is something else, so I hear. The young leaves near the top of the plant are edible, but they must be cooked because the stinging mechanism contains formic acid and only heat will neutralize it. The stinger is like a tiny syringe made of glass, in the nettles case it is a natural glass called silica. When the "glass" is broken by something rubbing up against it, the formic acid, which is somewhat under pressure, and from capillary action, enters the body and stings like mad! Formic acid is what ants carry in their stingers and fire ants have the most potent brew.
Here's a good site for more info on the edibility of nettles.
http://www.wildmanstevebrill.com/Plants.Folder/Nettle.html

Amazingly tall nettles-12+ feet
A nice patch of nettles in the background. Very tall and healthy.

Thursday, July 7, 2011

Tule uses

Tule Scirpus lacustris was once a very common plant here in the central valley of California. The valley floor was a maze of marsh's and lakes. The water table was close to the surface and it was a very delicate balance. Some marshland disappeared naturally but most succumbed to man. When the settlers moved in they drained the marsh's for agriculture thus driving out the natives and the plants that depended on the marsh environment. The natives used the tule for so many things: boats and rafts, mats to cover their houses, mats for sleeping on, mats for floor covering, clothing such as rain shawls and skirts, hats, dolls and other toys, duck decoys for hunting, basketry, and other uses. If you look at a tule reed head on you will notice it is made up of long tubular air pockets. This is why it floats so well and why it is such a great insulator. Dead air space is one of the important insulators in survival situations such as debris shelters and layered clothing.
At a recent basketry demonstration my wife and I bought some articles made from tule by the local Native American folks. All of these are simple designs, but elegant art work.


Miniature berry gathering basket head on view. The handle is redbud bark.
A side view of the basket.
A tule doll.
A duck decoy. The head was tied in with the twining. Some were used like this, others were covered with feathered duck skins.
 

Primitive/Survival Skills-Native American Basketry Day at the Kaweah Preserve

I had the pleasure to attend a basket making demonstration that included class's if you were so inclined. I spent most of the day wondering from class to class and garnering some priceless knowledge from local Native American folks about basketry and the plants used. I believe most of the folks were from different groups of the Miwok tribe. I learned a lot of good stuff and saw some fantastic works of art. Everyone was extremely helpful and answered my many questions about native plants and basketry techniques. There was a woman teaching about the tule, a member of the bulrush family, genus Scripus. At onetime the valley was covered with marshy areas and the primary plant was the tule. The natives made their house's, sleeping mats, floor covering, rafts, duck decoys, basketry, and even clothing from this versatile plant. Sadly, there is very little of this wonderful plant left. When the valley was settled, the first thing the pioneers did was to drain the marsh's for agricultural purposes. The tule disappeared as well as the local natives. You would be hard pressed to find a decent size patch nowadays.
We bought some of the tule items. I'll post pictures of them in another post.
Here is some info on the different plants used locally:
White root-the root of a local species of Carex sedge. Not sure which species.
Redbud bark-the bark of the western redbud tree, Cercis occidentalis
Willow-a native species of Salix, perhaps Arroyo willow Salix lasiolepis
Bracken fern-one of the native ferns that grown in the foothills and mountains-species unknown
Soap root-Chlorogalum pomeridianum a versatile native plant used for food, soap and fiber brush's
Deer grass Muhlenbergia rigens. a native grass, fairly common
Tule-Scirpus lacustris a once common native that had a variety of uses

Here's a link to the event which is held every year. http://sequoiariverlands.wordpress.com/2010/05/21/%E2%80%9Cgo-native%E2%80%9D-third-annual-native-american-cultural-celebration/

What Native American get together would be complete without drumming?
Toy cradle boards made from willow and woven with redbud bark and white root.
Here's an end shot of tule. Notice the numerous air pockets? This stuff is a great insulator and floats like cork.
Some more tule and some items made from it.
Tule dolls, miniature berry baskets, and duck decoys.
This class is doing coiled basketry using deer grass.
This incredible basket is made with coiled deer grass and using dyed bracken fern, and redbud bark for decoration.

A shot of the lid and a close up of the decoration-dark brown=bracken fern reddish brown=redbud bark.

Yet another shot of that beautiful basket.
These ladies are working with deer grass to make coiled baskets.

Heres a shot of some coiled deer grass-a lot of work to make a basket but the out come is fantastic!

This photo shows a basket with brush's made from soap root. The basket may have been used to clean or sift seeds and other food stuffs.
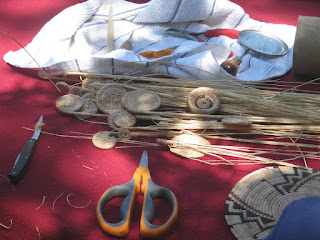
This photo show's bundles of redbud bark-big bundle tied with red string, dyed bracken fern-the dark chocolate brown bundle, and natural colored bracken fern, the tan bundle. Also shown are some pieces of obsidian, a deer leg bone and a leg bone awl, a bundle of sage, and a musical instrument made from split bamboo.
I like the photo in the frame. Those are some wonderful NA baskets!
This is one of the teachers who taught coiled pine basketry. The needles are used to sew the coils together with various fibers and plant materials.
This is the burden basket class. They are making miniature versions of the burden basket.
This tub is used for soaking basketry materials to make them pliable and supple.
Burden basket class. Beginning the bottom weave using white root and willow shoots.
The beginnings of a burden basket.
The first weaves are the hardest part.
The completed bottom of a burden basket.
Here's a bundle of willow shoots and a partially completed burden basket.
This photo shows a cradle mat made from willow woven with white root and redbud bark. There are some willow shoot bundles under it.
This teacher is cutting tule into lengths for making dolls, duck decoys, and berry baskets.
This is one of David Garcia's baskets made from coiled pine needles. I think the weaving material is dyed raffia.
This is a pine needle coiled basket beginning.