Rons Primitive Skills

Custom Search

Search This Blog

Saturday, August 30, 2008

Woodworking videos

Here's a link to a video from Sweden. Its silent black and white film and show craftsmen making wooden shoes, a spoon and a chair. The level of craftsmanship is incredible.

http://svt.se/svt/road/Classic/shared/mediacenter/index.jsp?&d=48192&a=534420

This next link is from Finland and has several videos showing early 20th century wood working. The first one is a dug out canoe.

http://www.kansatieteellisetfilmit.fi/haaparuuhi_wmv.htm

This one shows working with knives and axes.

http://www.kansatieteellisetfilmit.fi/puukolla_wmv.htm

In all the films you'll notice some very familiar tools such as Scandinavian blades like the Mora and Puuko as well as Scandinavian style axes. Its amazing how skilled these folks are. They make it look so easy, but then, they've been doing this all their lives. Hope you enjoy them!

Friday, August 29, 2008

Sierra Nevada Wildflowers

Psalm 103:15 As for man, his days are as grass; as a flower of the field, so he flourishes.

Here are some photos of wildflowers I've taken over the years in the Sierra Nevada mountains. Please left click on the individual photos and it should enlarge to fill your screen for better detail. Photos were all taken with an Olympus FE 130 digital camera using normal, macro and super macro mode.

All of these pictures were taken in Sequoia National Park.

This photo shows the Mountain Monkey flower. FAMILY: Scrophulariaceae SPECIES: Mimulus tilingii. Flower +/- 1/2" long.


Here's a close up of the above flower.


This is a photo of Mustang Linanthus. FAMILY: Polemoniaceae SPECIES: Linanthus montanus. Flower +/- 1/4" in diameter.


Here's a closeup of the above flower.


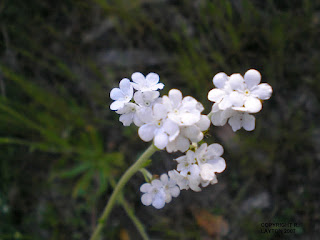
This photo shows Popcorn flower. FAMILY: Boraginaceae SPECIES: Plagiobothrys nothofulvus.
Individual flower +/- 1/4" in diameter


This photo shows California Poppy. FAMILY: Papaveraceae SPECIES: Eschscholzia calofornica. Individual flower +/- 1" in diameter

These next three photos show birds-eye gilia. FAMILY: Polimoniacea SPECIES: Gilia tricolor. Individual flower +/- 1/4' in diameter. Notice the beautiful blue anthers!

Same as above.

Same as above.

These next two photos show my favorite wild edible, Miners Lettuce. FAMILY: Portulacaceae SPECIES: Montia perfoliata. Individual flower +/- 1/4" in diameter. These are related to common purslane.


Here are some photos of Western Redbud. SPECIES: Cercis occidentalis. Flower is pea like and about 3/4" long.

Heres a Western Redbud tree. The local indians frequently used this tree for basketry.

Here is the beautiful Benthams Lupine. FAMILY: Leguminosae SPECIES: Lupinus benthamii. Flower +/- 3/4" long.
Here's a photo of Manzanita FAMILY: Ericacea SPECIES: Arctostaphylos glauca. Flowers +/- 1/2" long.

Same as above but pink flowers.

Here's a shot of the whole shrub.


This is a photo of Fiddle Neck. FAMILY: Boraginaceae SPECIES: Amsinckia intermedia. Flowers +/- 1/4" in diameter.

This one is unknown to me but very pretty. Flowers +/- 1/4" in diameter.


This is a photo of Grand Hounds-Tounge FAMILY: Boraginaceae SPECIES: Cynoglossum grande. Flower +/-3/4" in diameter.


This is a photo of the above showing the whole plant. This plant is a little over two feet high.


If you find any errors in my identification, PLEASE let me know and I will make corrections. It will benefit all of us.

Sunday, August 24, 2008

Firesteels and antler handles

Here's a project I just finished. This is a pair of ferro cerium firesteels I put into deer antler handles and containers. The first photo shows them in the closed position. I used a file to smooth off the edges on the antler after the epoxy set up.


This photo shows a close up of the steel and handle. The rod is 1/4" X 2 1/2" and were bought from Ben's Backwoods store. These Scout rods are rated at 3000 strikes.


Here's a photo showing the drilled out container portion. I used a drill bit the same diameter as the rod and then widened it a hair with the same bit for a loose fit.


This photo shows them partially open. Note how the string setup works. You basically run the string through the handle hole twice kind of like a figure "8".


This photo shows the firesteels in the ready to use configuration.


This is where I got the inspiration for this project. These beauty's are made by Frenchy in England. Very nice work!!! Here's a link to his site:

http://www.customknivesandsticks.co.uk/firesteels.htm


This is another of Frenchys firesteels. I didn't make the cord on mine as long as his. I prefer to carry mine in my pocket.


These are some firesteels I mounted in antler tines. I use two part epoxy that sets up in 20 minutes. It gives me time to position them better when it reaches the tacky state. As you can see the dry epoxy hasn't been trimmed from the top two. These are the 1/4" X 2 1/2" Scout firesteels that I got from Ben's Backwoods store.

This is a fire kit I made many years ago. this shows the leather case, knife and flint rod.


Here's a photo of the set with the knife open. These old knives have high carbon steel blades and really throw the sparks! These can be picked up for a dollar or so at yard sales and flea markets. Most of them have some kind of advertising on the handle.


Here's a photo showing the above flint rod and another one I made. These rods have a diameter of 3/8" and 3" long.


When I use a firesteel I pull the rod away from the tinder holding the knife steady against the flint. I find this works a lot better than scraping the rod with the knife and accidentally knocking your tinder all over the place.

Wednesday, August 13, 2008

New knife

My father in law bought me one of these (first photo) recently. Its the Ontario Spec Plus Air Force survival knife. The blade is the same as the old Ontario leather handled survival knife I was issued in 1971. It was called the Pilots survival knife then. The new model is made of 1095 high carbon steel as was the old model. The photo below shows the new version. All in all its a very nice, well built knife. I actually like the handle on this one better. The old leather handled version was good, don't get me wrong, but in the dry Arizona climate mine shrunk and the hexagonal hammer head/pommel wiggled a bit. I soaked it for a week in neatsfoot oil and this helped for a little while but a month later it was loose again.

I modified the new one the same way I did the old model. I dulled the top edge on the front of the blade. This makes it easier to do things like draw with the blade without cutting your fingers. I never really understood why they sharpened this. Another thing is the saw back. This was made to cut through the thin magnesium-aluminum alloy skin of an aircraft. I actually used my old one to saw through a piece of palo verde but it took a long time. It would be nice if they left the back plain. There are more than enough choices for a good, portable survival saw available. As for the so called "blood grove", it aint no such thing. My quartermaster was a very knowledgeable guy and he said it was there to give the saw clearance while making curved cuts. Makes sense to me.

I did what I always do to a new knife. I took off the edge and resharpened it. The reason I do this is thus: the boys at the factory sometimes get a little carried away with the belt sander or grinder and get a little too much heat on the edge. When you remove the factory edge and resharpen, you get into new, untouched steel and your edge will be very sharp as well as durable. The edge from the factory was very sharp but there were a few spots where it was a bit rough. My resharpening took it to a mirror finish, razor sharpness. I've skinned two cedar logs with it and it still pops arm hair.

This picture show another model of an Ontario knife. I used it to show what the sheath looks like on mine. Its exactly the same. I like the double security of two handle loops. The old model has only one loop and I remember loosing mine once because of a defective snap. I did find it, fortunately, and had the quartermaster fix the sheath. (I think he just threw it away and gave me a different one.) Another difference is the old sheath had an outside pocket with a small carborundum stone. It was handy for touching up the edge but not doing a full sharpening job. The new sheath doesn't have a pocket or stone. I think I'll add a pocket somehow and through in a ferro-cerium spark rod and a diamond sharpener. The sheath is well made from heavy leather and cordura nylon

Here's a photo of the original "Pilots survival knife". Mine was dated (on the pommel) 1-71 or January 1971

This is a very good knife and I would recommend it to someone looking for a decent, moderately priced survival knife. By the way, since I got the Spec Plus, my wife decided the old Schrade Walden sheath knife is hers now. She really likes that knife!

Tuesday, August 12, 2008

Modified Speedy Stitcher sewing awl

Here's a modification I did to a speedy stitcher. The first photo shows one as it comes from the store. I cut the handle short and added three more holes under the collet (chuck lock) into the ferrule to hold 5 needles. Being shorter makes it easier to use as it fits in my hand better and it takes up a lot less room in my sewing kit.

Here's the collet (chuck lock) on the left and you can see the top of the ferrule and the extra holes I made for more needles. I used an automatic center punch to mark the holes and then very carefully drilled deep enough to match the depth of the existing needle holes.


I've edited this post with a copy of the instructions that come with the speedy stitcher.

Sunday, August 10, 2008

Getting a handle on the Lauri blade

Here's a project I did today. This is the Lauri from Finland blade I got from Bens Backwoods store. I used a piece of western red cedar I found last weekend in Sequoia National forest. The first photo shows the handle nearly finished. The other pieces of wood are from the same piece. As you can see I removed a lot of wood. I keep the shavings in a baggie for fire starting. They work great.


Here's a close up of the nearly finished handle. I only need to remove a bit of the butt end.


This is the finished handle. All it needs is drilled.


This is a close up of the end of the handle.


Here's a view of the end grain. Western red cedar is a very nice, fine grained wood.


These are the tools I used to make the handle. The "four-in-hand" rasp/file is one of the handiest tools for wood working and I carry it in my survival kit. The leather sheath protects the teeth as well as anything else in the kit.


Here's a test to see how the blade fits in the handle after drilling. I used an electric hand drill for this stage of the job. So far so good. IMPORTANT NOTE!!!!!! COVER THE BLADE WITH MASKING TAPE WHENEVER YOU WORK ON A KNIFE!!!!!! The masking tape has been removed ONLY during the photo shots!


Here's a shot of the finished knife. I used an old worn out silver quarter and a dime for the front and back of the handle. I drilled and filed the front piece till it fit the blade just perfect. I domed the dime on my anvil with a small ball peen hammer and drilled a hole in the middle. Then I used my Dremel tool with a cut off wheel to make several scores in the tail end of the tang. These would help the dime to get a good hold when I seat it. After everything was put together and nice and tight I set to work finishing the knife. I cut off the end of the tang with my Dremel and a cut off wheel, then filed the end smooth. I carefully filed the silver down to meet the wood on the handle. Then I gave the handle a smooth sanding with 300 grit silicon carbide paper. I love the way the handle is contoured.


Here's a shot of the knife where the blade fits in the handle. As you can see its slightly off center. Mistake #1. But, I can live with it.

Here's a shot of the butt end. Mistake #2. The dime is off center and once again, I can live with it. This is what happens sometimes when you drill by hand. It may seem like the hole is dead center but after all the filing and fitting the end result tells the truth. When I tightened everything up the tang and blade pulled to the left side of the handle. What the heck, it gives it a unique personality!


Here's another shot of the finished knife. What a beauty. It fits my hand perfectly and it looks very nice even with the goofs. Overall length: 8 1/8" handle length: 4 1/4" blade length: 3 3/4"
Next project: a sheath for Lauri.


Eventually I will  refinish this handle to be more ergonomic and fix the off center silver on the butt end. Fortunately I made the handle a bit big so there's room for improvement. Look for a future post.


Here are the specs for this blade from Bens Backwoods store.

NEW LAURI HIGH CARBON PROGRESSION TEMPERED 116P BLADE.
3.7" X 3/4" WIDE BLADE.

8 1/4" OVERALL WITH A 3MM THICK BLADE.

PROGRESSION TEMPERED BLADE WITH SPINE HARDENED TO RC 52 AND EDGE HARDENED TO RAZOR SHARP RC63.

UNPOLISHED BLADE WITH SCANDINAVIAN GRIND.

RAZOR SHARP MADE IN FINLAND
.